
INSTALLATION
AND GROUNDING
MOUNTING LOCATION - THIS SECTION APPLIES TO THE PROCASTER AM
Mount the transmitter vertically. The Procaster comes with U-bolts that can accommodate up to a 1-5/8in mast. The antenna must be in the open away from items such as walls, fences, masts, trees, power lines and other obstructions – see mounting methods below. For example, a good location would be on the roof of a 2-storey building at the end of a mast. Note: you need to be able to reach the transmitter for antenna tuning when in its final position. You cannot tune the transmitter on the ground and then raise it up.

GROUNDING
AM transmitters are ground-based systems and need a good ground for optimum range and signal strength as well as protection from lightning. Lightning will usually take the easiest path to ground thus preventing accidental entry into the home.
IMPORTANT! Proper grounding is also essential for electrical safety and lightning protection. Thr Procaster has internal lightning protection which will only work if connected to a good ground. Lighting always wants to follow the most direct path to earth - make sure you follow your local electrical codes in regard to grounding - if you are unsure, consult a licensed electrician. Avoid installing near high voltage electrical lines in case of contact!
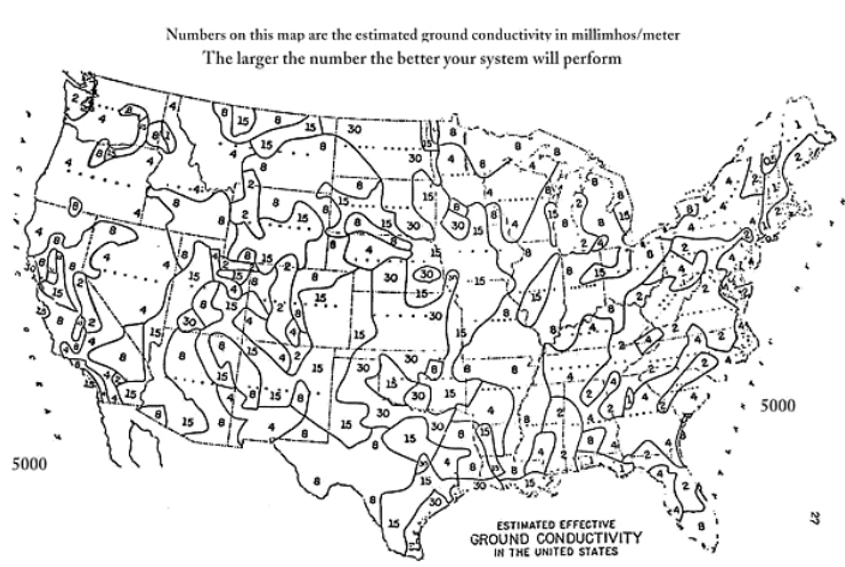
Ground conductivity varies with geographical location as shown in this US ground map below. If you are unfortunate to be in a poor conductivity area, you may need to enhance your ground system such as adding sodium bentonite into the earth where the ground rods are located. Sand and gravel even when wet, often result in poor grounds. Salt water marshes are best.
Performance is also dictated by your range requirement – if your range is not required to be very far (for example, a truck depot), the quality of your grounding is not as important, but you still have to be vigilant concerning lightning.
For more grounding information, visit the National Association for Amateur Radio (ARRL): http://www.arrl.org/grounding
There are several methods of grounding the Procaster. We recommend using a ground rod as the most straightforward method.
GROUND ROD
The simplest and most popular method is to use a 5/8in x 8ft ground rod (steel core surrounded by copper) driven into the ground full length. Several ground rods spaced 6ft apart and joined together can further reduce the resistance to ground. Keeping the ground moist by locating rods near an air conditioner drip point or run-off from a roof downspout can also reduce overall ground resistance. The following parts may be obtained from your local hardware store:


5/8in bronze clamp
5/8in x 8ft copper clad steel ground rod

#6 gauge 7 strand copper wire
(Note: either bare or plastic covered wire may be used. The bare wire shown above is typically used to ground electrical panels and is readily available).
Run the copper wire down from the Procaster as straight and directly as possible to the ground rod trying to avoid sharp turns. Attach a 6 gauge 7 strand bare ground wire using a 5/8in bronze clamp as shown below:

If you need to connect several ground rods together, simply continue the wire through the clamp and onto the next rod and clamp and so on. Smear clamp with automotive grease to reduce corrosive effects.
If your ground is hard or has clay, you can use the water drill method instead of pounding with a sledgehammer. This method uses a hollow tube (copper preferably) with a hose attached at one end. The flowing water washes away earth and allows the tube to penetrate into the ground. There are several examples on YouTube explaining how to do this.
Other grounding methods include (more information can be found online).
RADIAL GROUND SYSTEM
The Procaster should be located in the centre of the radial pattern and the ground radials should be as long as your antenna is high (examples online).
METAL ROOF
A metal roof can provide an effective elevated ground system if the metal panels are electrically connected to one another. The Procaster can be mast-mounted on a tripod which is attached to the roof with bolts or is held in position with concrete blocks. The advantage of the elevated ground system is that the transmitter is higher and more likely to have better range. Connect to the ground lug of the Procaster with a 6 gauge copper wire.
UNDERGROUND METAL WATER PIPES
(CAUTION – lightning could enter building using this method) Electrical panels usually ground to the copper water pipe very near to where it comes out from the ground inside the building. It is unknown how well these pipes are connected electrically, and the electrical system may induce noise into the Procaster which will be heard on the receiving radio. Connect to the ground lug of the Procaster with 6 gauge copper wire.
BUILDING ELECTRICAL GROUND
(CAUTION – lightning could enter building using this method) Building electrical grounds can work quite well, but there is the risk of electrical noise from household appliances getting picked up by the Procaster and transmitted to the receiving radio. This is something you have to try out and see - all situations are different. Connect to the ground lug of the Procaster with a 6 gauge copper wire.
FINAL CHECKOUT
Check your sound level and range by listening on a radio. The broadcast signal should be clear and strong when closer to the transmitter, with more noise heard the further you move away.